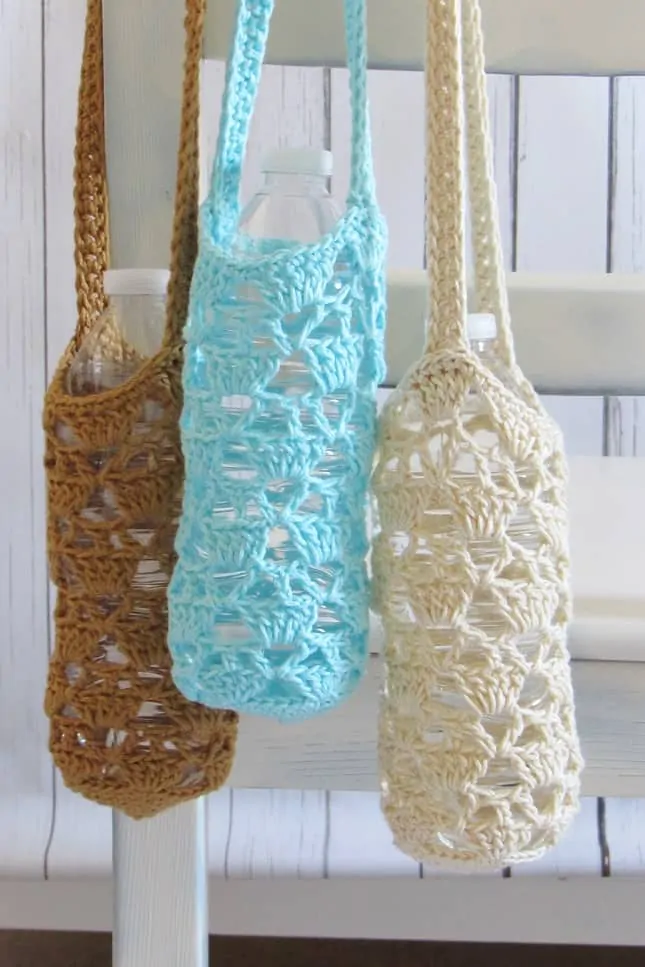
Crochet Water Bottle Holder Pattern: Stay Hydrated in Style with This Free Design by Crochet Dreamz
Staying hydrated is essential, and what better way to carry your water bottle than with a stylish and practical crochet water bottle holder?
In this poar, we’ll explore a fantastic crochet pattern for a water bottle holder by Crochet Dreamz that combines functionality and creativity.
Get your hooks ready and let’s dive into this exciting project!
This water bottle crochet pattern is perfect for all crocheters of all levels! Not only is this pattern super simple but it’s quick too. They were designed to fit 500 ml plastic water bottles, but can easily be made to fit metal water bottles by simply adding a few rows. The pattern is pretty easy to memorize as well so that you don’t have to continually look up and down from the written pattern.
Shehnaaz, Crochet Dreamz
Materials Needed
To create your own crochet water bottle holder, you’ll need the following materials:
- Worsted weight yarn in your desired color(s)
- Crochet hook (size will depend on the yarn weight)
- Stitch markers
- Yarn needle
- Button or closure of your choice
Crochet Techniques
Familiarizing yourself with the following crochet techniques will help you be successful crocheting the Salvatore Slouch Hat.
- Chain Stitch (ch): This basic stitch forms the foundation of many crochet projects.
- Single Crochet (sc): Mastering the single crochet stitch is essential for creating the body of the hat.
- Half Double Crochet (hdc): This stitch is used to add texture and height to the hat.
- Front Post and Back Post Stitches: These stitches create a ribbed effect, adding elasticity and structure to the hat’s brim.
To work up this slouchy hat pattern you’ll also need to know how to:
- Crochet flat in rows
- Crochet in the round
- Crochet in the back loop only (pattern includes linked video tutorial)
- Crocheting evenly around the side of a project
- Seaming with the mattress stitch (video tutorials included in pattern)
- Use the “cinch method” for closing a slouchy hat (pattern includes link to photo tutorial).
Pattern Overview
Can’t wait to whip up your own Crochet Water Bottle Holder?
Here’s a general overview of the steps you’ll need to follow:
Step 1: Base Chain: Begin by creating a foundation chain that fits comfortably around your water bottle. This will serve as the base for the holder.
Step 2: Single Crochet Rounds: Work single crochet stitches in rounds to create the body of the holder. Adjust the number of stitches according to the size of your water bottle. Mark the beginning of each round with a stitch marker.
Step 3: Height Adjustment: Continue working single crochet rounds until the holder reaches your desired height. You can make it snug or leave room for additional items like keys or a phone.
Step 4: Handle Formation: Start shaping the handle by leaving a gap in the stitches. This will allow you to slide the holder over your shoulder or attach it to a bag. Secure the handle by reinforcing the stitches and adding extra rounds.
Step 5: Finishing Touches: Add embellishments or decorative stitches to enhance the aesthetic appeal of your water bottle holder. Consider using contrasting colors, stitch patterns, or appliques to make it unique.
Step 6: Button or Closure: Finish off the holder by adding a button or closure of your choice. This will help keep your water bottle secure and prevent it from slipping out.